 |
Tip 30: How to create a bootable Windows 2000/NT installation CD-ROM? |  |
|
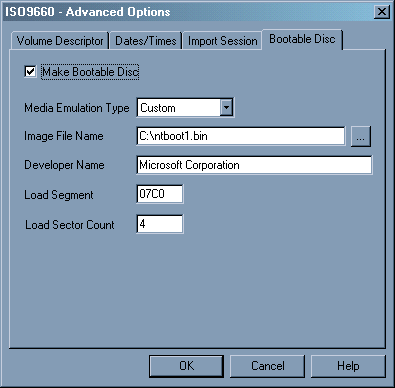
Its possible to create a bootable CD-ROM from the basic I386 structure. This is useful when creating a new bootable CD, maybe after incorporating (slipstreaming) a Service Pack into the source directory i386. You will (at a minimum) require version 3.7D of CDRWIN from http://www.goldenhawk.com/ and you will need to load the necessary ASPI drivers. The free download version is fully functional but will only write at 1 speed. Before starting the CD creation create a directory and copy into it the I386 structure of 2000 and certain CDROM_xxx.5 file(s) from the root of the CD-ROM. You can check which CDROM_xxx file(s) are possibly needed by looking at the [SourceDisksNames] section in file i386\layout.inf and getting them from the root of the CD-ROM, for example:
[Version] Now you have a directory on disk with the I386 structure and the CDROM_ia.5 files. There is a copy of such a file and the boot sector of the CD-ROM in file BOOTCD.ZIP which will allow you to skip steps 1 to 5 below.
Once CD compilation is complete you will have a file where you specified the ISO9660 Image File of around 400MB which may be deleted (its just the ISO image that was copied to the CD). You will now be able to boot with the CD (providing the motherboard and bios support CD-ROM booting). You can also use the above to make a Windows NT4 bootable CD in the same way. It’s the same instructions as Windows 2000, except that instead of CDROM_IS.5 (for server) you need the CDROM_S.40 (or equivalent _W.40 for workstation). You also need the bootfix.bin file from a Windows 2000 i386 directory (this is the cool bit that says "Press any key to boot from CD-ROM").
|


 |
|
 |